When I talk to other fashion bloggers, I always ask them a bit about their workflow for editing photos. Most tell me that they use Photoshop to edit their photos, but a surprising number have never even heard of Lightroom. That is surprising to me because Lightroom is the application that I use the most when I am editing fashion blog photos. While Photoshop is an amazing application for editing photos, it is only meant to work with one photo at a time, and it doesn’t give you the ability to organize your photos in any meaningful way.
Lightroom, on the other hand, allows you to import all your photos into one catalog, so that you can browse them, organize them, flag them, make edits, and then quickly export them at the appropriate size. Since it is an Adobe product, Lightroom also seamlessly, and non-destructively integrates with Photoshop, so that if you need to, you can quickly open up your photos in Photoshop and make more complicated edits there without having to worry about accidentally saving over and losing the original image.
Some photographers will tell you that it is important to get your photos right in camera. While that is true, to a degree, if I learned anything about photography during my 5 years managing a Photoshop and Lightroom website, it’s that if you really want to take your photography to the next level, it’s important to understand a bit about postproduction.
In this article, I will walk you through my workflow for editing fashion blog photos using both Lightroom and Photoshop. After reading this article, you should have a good grasp of how these two applications will help you organize and edit your photos in a much more efficient way. Let’s get started!
What You Need to Get Started
The first question that most people ask me when I talk to them about Photoshop and Lightroom is “how much does it cost?” Photoshop has a reputation for costing quite a bit of money. Since the release of Adobe’s Creative Cloud, however, Adobe has reduced the cost of the application quite a bit. In the past, you might pay $300 for a copy of Photoshop that you might use for 2 years before you upgrade. Now, you can subscribe to both Photoshop and Lightroom for just $9.99 per month (around $120 per year).
In addition, the Creative Cloud Photography Plan also gives you access to Lightroom Mobile, which automatically syncs the photos on your computer with your iPhone or iPad, so that you can have access to your photos, even when you don’t have your computer with you. This is really great for anyone that likes to post to Instagram a lot, because your photos are always on your phone.
The Creative Cloud Photography Plan is available as a 30-day free trial. So if you would like to give it a try, feel free to head over to Adobe’s website and sign up.
1) Before You Begin: Shooting in Raw Format
When you shoot your photos, it is really important that you shoot everything in raw format. I talk to a lot of fashion bloggers that prefer to shoot in JPG because it’s more convenient, or because they say that the raw format takes up too much hard drive space.
While it is true that raw files are large, and take up a lot of hard drive space, don’t let that affect the quality of your photos. Hard drive space is cheap, and most photographers store all their photos on external drives. Also, the fact that raw files are bigger is actually a good thing. Raw files simply give you more data to work with, and that allows you to correct parts of an image that you simply can’t correct in a JPG image.
Raw format also give you more flexibility to fix things like White Balance. You may notice that sometimes, your images look a bit too yellow or blue. Shooting in raw format will give you more flexibility to adjust the color temperature of your photo after it has been taken, which is why I always shoot my photos using Auto White Balance, because I can always edit that setting in Lightroom.
Also See: Should You Be Shooting Raw?
2) Importing to Computer
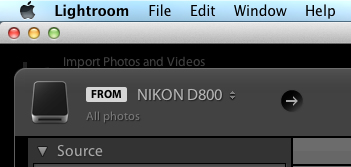
Lightroom makes it easy to get the photos from your camera onto your computer. To get started, first open up Lightroom. Once Lightroom is open, insert your memory card. Lightroom will automatically detect the memory card and will open up an Import Dialogue Box. If for some reason Lightroom does not open up an Import Dialogue Box, just browse to File > Import Photos and Video.
In the Import Menu, there are a few things to keep in mind. At the top left of the screen, you’ll see a Select a Source option. If Lightroom automatically detected your memory card, you should see your memory card listed there.
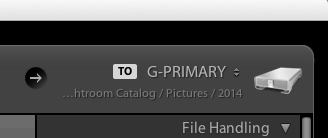
At the top right of the screen, you’ll see where Lightroom is going to copy the files from your memory card. You can tell Lightroom exactly where you would like to store your photos. I keep all of my photos in one place, on an external hard drive.
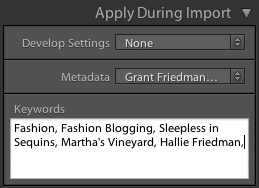
In addition, you can also add keywords and meta data to your photos. I add keywords to help me filter through my photos at a later date. For instance, I might add someone’s name as a keyword, that way, I can easily filter through all the photos of that person at a later date.
Also See: Importing Your Images
3) Make Your Picks
Lightroom really shines as a tool to help you select your favorite shots. Once you have imported all your photos, you should see them on the screen. If not, go to View > Grid (G). All of your most-recent imports should be shown as thumbnails.
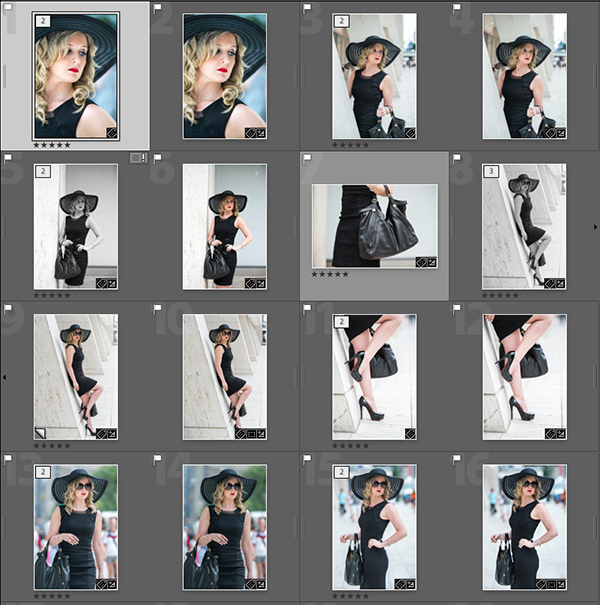
Double click on the first photo to view it, and use your arrow keys to browse to the next photo. If you see a photo that you like, you should see a couple of flag icons near the bottom of the screen. By clicking the Flag as Pick icon, or by pressing the (P) key on your keyboard, you’ll be able to flag that photo as one that you like. If you don’t like the photo, press (X) on your keyboard or click the Set as Rejected icon.
You can also apply star ratings to your photos. I use star ratings to add another level of filtration to my image sets. So if I really like an image, I might also give it a 5-star rating just to remind myself that it was one of my favorites.
Also See: Select, Rate and Prioritize Your Images
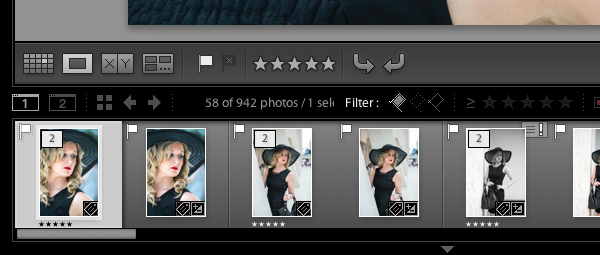
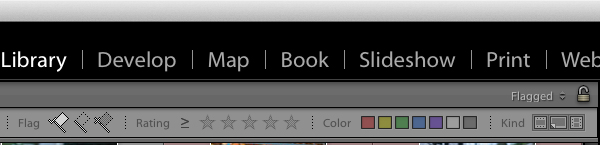
4) Filter Your Photos
Now that you have viewed all of your photos, and have flagged the ones that you like, you probably want to browse through them to refine them a bit more.
To do this, go to View > Grid (G), or press (G) on your keyboard. This will put you into Grid View. Towards the top right of the screen, you’ll see a dropdown that says Filters Off. Click that and select Flagged, that will show you all the photos that you have flagged.
You will also notice that you can filter by Star Ratings, Text, or Meta Data. Lightroom gives you quite a bit of options to help you filter through your picks, but you’ll probably use the flag and star rating filters the most.

5) Edit Photos in Develop Module
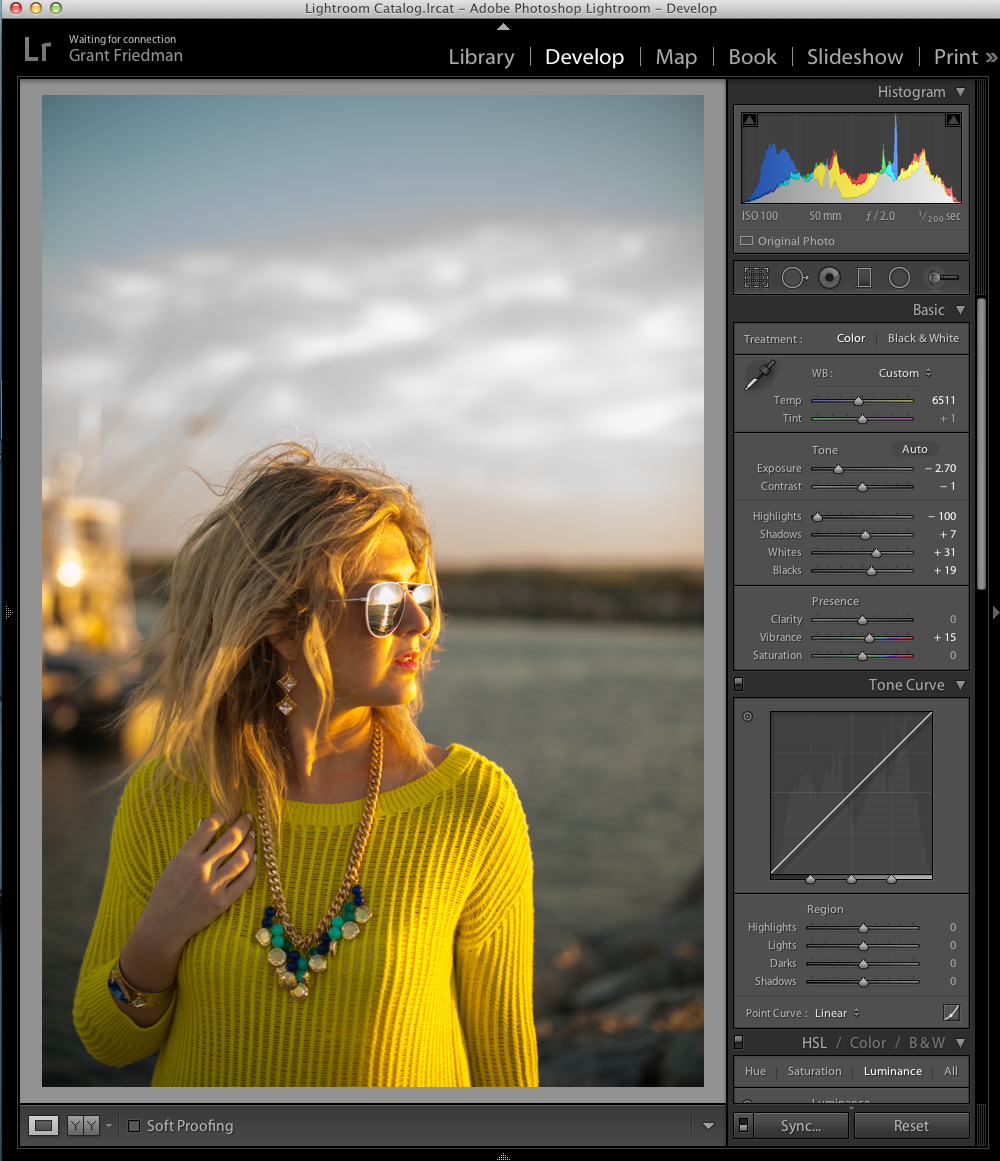
Now that you have picked all your photos, the next step is to edit them. Lightroom has some really powerful features to help you make adjustments to your photos. To access these features, you’ll need to use the Develop Module. You can find the Develop Module at the top right of the screen, or you can press the (D) key on your keyboard.

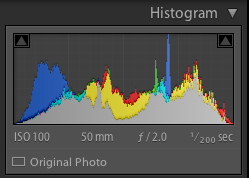
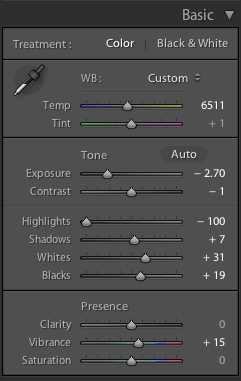
Once in the Develop Module, select a photo. On the right side of the screen you’ll see a column with many options. For the most part, you’ll use the Histogram and Basic Panel more than anything else.
A Histogram is a graphical representation of the lights, darks, and colors of your photo. The lighter tones are represented on the right side of the histogram, the darker tones on the left, and the midtones in the middle. I won’t go into too much detail about the Histogram in this article other than to say that it’s a very helpful tool to help you expose your image properly, and that I use the Histogram as a guide to make sure that I am not over or under exposing my image in Lightroom. If you want to know more about Histograms, see this tutorial.
The Basic Panel is where you will most-likely be making most of your changes. The Basic Panel includes options for White Balance, Exposure, Contrast, Highlights, Shadows, Whites, Blacks, Clarity, Vibrance, and Saturation. You can use these sliders to not only correct your photo’s exposure, but to also help make your image pop. This tutorial from Julianne Kost is a great start if you would like to learn more about the Develop Module.
These options might be a bit overwhelming, at first but they are pretty straightforward. Below, I’ll explain a bit about how I use them.
Cropping: Lightroom includes some powerful and non-destructive Cropping features. Use the Crop tool to crop out parts of the image that you don’t need, or to help re-compose your image a bit better.
White Balance: How does the overall tone of your image look? It is too warm? Too cold? If you are shooting in raw format using Auto White Balance, your camera should do a pretty good job of selecting the right color temperature. Sometimes, your camera will get it wrong, however, and you will have to manually adjust these settings. For instance, your image might be a bit too warm, to fix that, simply drag the Temp slider over to the left until your image looks the way you want it to. If your image looks to blue, drag it to the right to warm it up. You can also try using the presets in the dropdown menu.
Exposure: This affects the overall brightness of your photo. For the exposure setting, I also look at the Histogram to make sure that the peaks are as close to center as possible. Once everything is centered up, the exposure usually looks pretty good. There are exceptions however. This tutorial from Phlearn explains a bit about how the histogram for each photo is different.
Contrast: Contrast can add a bit of pop to your photo. I usually add a bit of contrast to my photos but I try not to go overboard for portraits. I usually set it to around +15.
Highlights: The Highlights slider will reveal or hide details in the highlights. For fashion blog photos, I’ve found that it does a really good job of revealing details in the sky, which can often be blown out. I find myself often pulling the highlights back to -100. Be careful though, as revealing too much detail in the highlights can also make skin look blotchy. So above all, just keep an eye on your image as you adjust your slider.
Shadows: The Shadows slider will reveal or hide details in the shadows. If you are shooting into the sun, for instance, and your subject is in silhouette, try increasing the shadows to reveal details in the face. The Shadows slider is also great at revealing or hiding details in clothing.
Whites and Blacks: Once I’ve set my Shadows and Highlights, I’ll use the Whites and Blacks sliders to help adjust my histogram. I usually try dragging them to the left or right to make sure that there isn’t any clipping in the photo. Make sure to keep an eye on your image though so that you don’t do anything here to negatively affect the look of your photo.
Clarity: Clarity is very similar to Contrast except that it affects mid-tone contrast. I usually give my fashion photos a bit of clarity to make them pop a bit. It is really easy to go overboard with Clarity though. So make sure you use it in moderation.
Vibrance: Depending on the image, Vibrance can really help make the colors in your image pop. It is very similar to Saturation except that it doesn’t affect skin tones as much. I’ll often give my photos just a bit of Vibrance.
Saturation: Saturation will help boost the colors in your photo. Used in moderation, it can help to make your photos a bit more interesting.
Editing in Photoshop (Optional)
Once you have made all your basic edits in Lightroom, you might need to make some more complicated edits in Photoshop. While Lightroom is great at organizing and making color adjustments to large amounts of photos, Lightroom isn’t a very good photo manipulation or retouching tool. If you need to remove blemishes, or perform any complex cloning, you’ll need to use Photoshop.
To do that, simply right-click on a photo in Lightroom, Select Edit In > Edit in Photoshop CC 2014 (or whatever version you are using), and Lightroom will automatically open that photo for you in Photoshop. When you have finished making your changes in Photoshop, save the file, and Lightroom will automatically add a new updated file to your catalog with the changes, while leaving the original intact. It does this so that you always have access to the original image.
Also See: Moving Between Lightroom and Photoshop
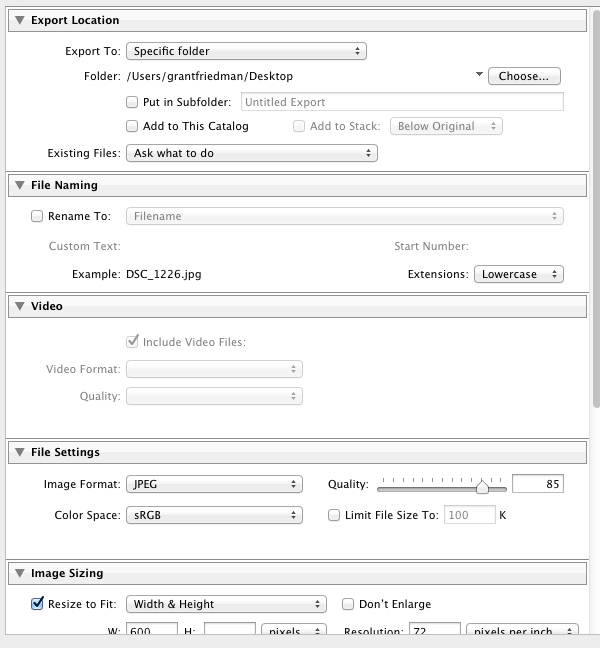
6) Export
Now that you have made edits to all your photos, you’ll now want to export these photos so that you can post them on your blog, Instagram, etc. To do this go to the Grid View (G), select the photos that you want to export, then go to File > Export. When the Export Dialogue Box appears, select the folder that you want to export your files to, set the Image Format, the size, or even add a watermark. Once you hit Export, Lightroom will automatically export all the photos that you have selected.
Also See: Exporting Images
Conclusion
Lightroom is an extremely powerful photo editing tool that you can use to help organize and edit your photo collections much more efficiently. I hope that this article has helped you to understand the benefits of using Lightroom to manage your fashion blog’s photos, and I hope that it has taught you a bit about how to make your photos look better. If you ever have any questions, please don’t hesitate to ask. Thanks so much!

5 Comments
This was such great info! Thanks so much!
That was incredibly helpful!! Thank you :)
I am glad you have explained all of the steps in details from importing to exporting! If someone can follow all of these steps then he/she will not need to go anywhere else! Thank you indeed.
Thanks for sharing. Hope you will share more.
As a fashion blogger, your guide helps me so much. Next time I am going to apply your tricks.